

The most breathtaking botanical designs don't always begin with a gentle touch; they often start with the clinical precision of a 0.4mm stainless steel edge. While we all cherish the soft, organic feel of clay, spending 45 minutes sanding a single pair of earrings feels like a theft of your creative joy. You want your work to look handcrafted, not "homemade" or messy. We've all been there, staring at a ragged petal edge that just won't smooth out. It's frustrating when your vision is a delicate wildflower but the result feels clunky.
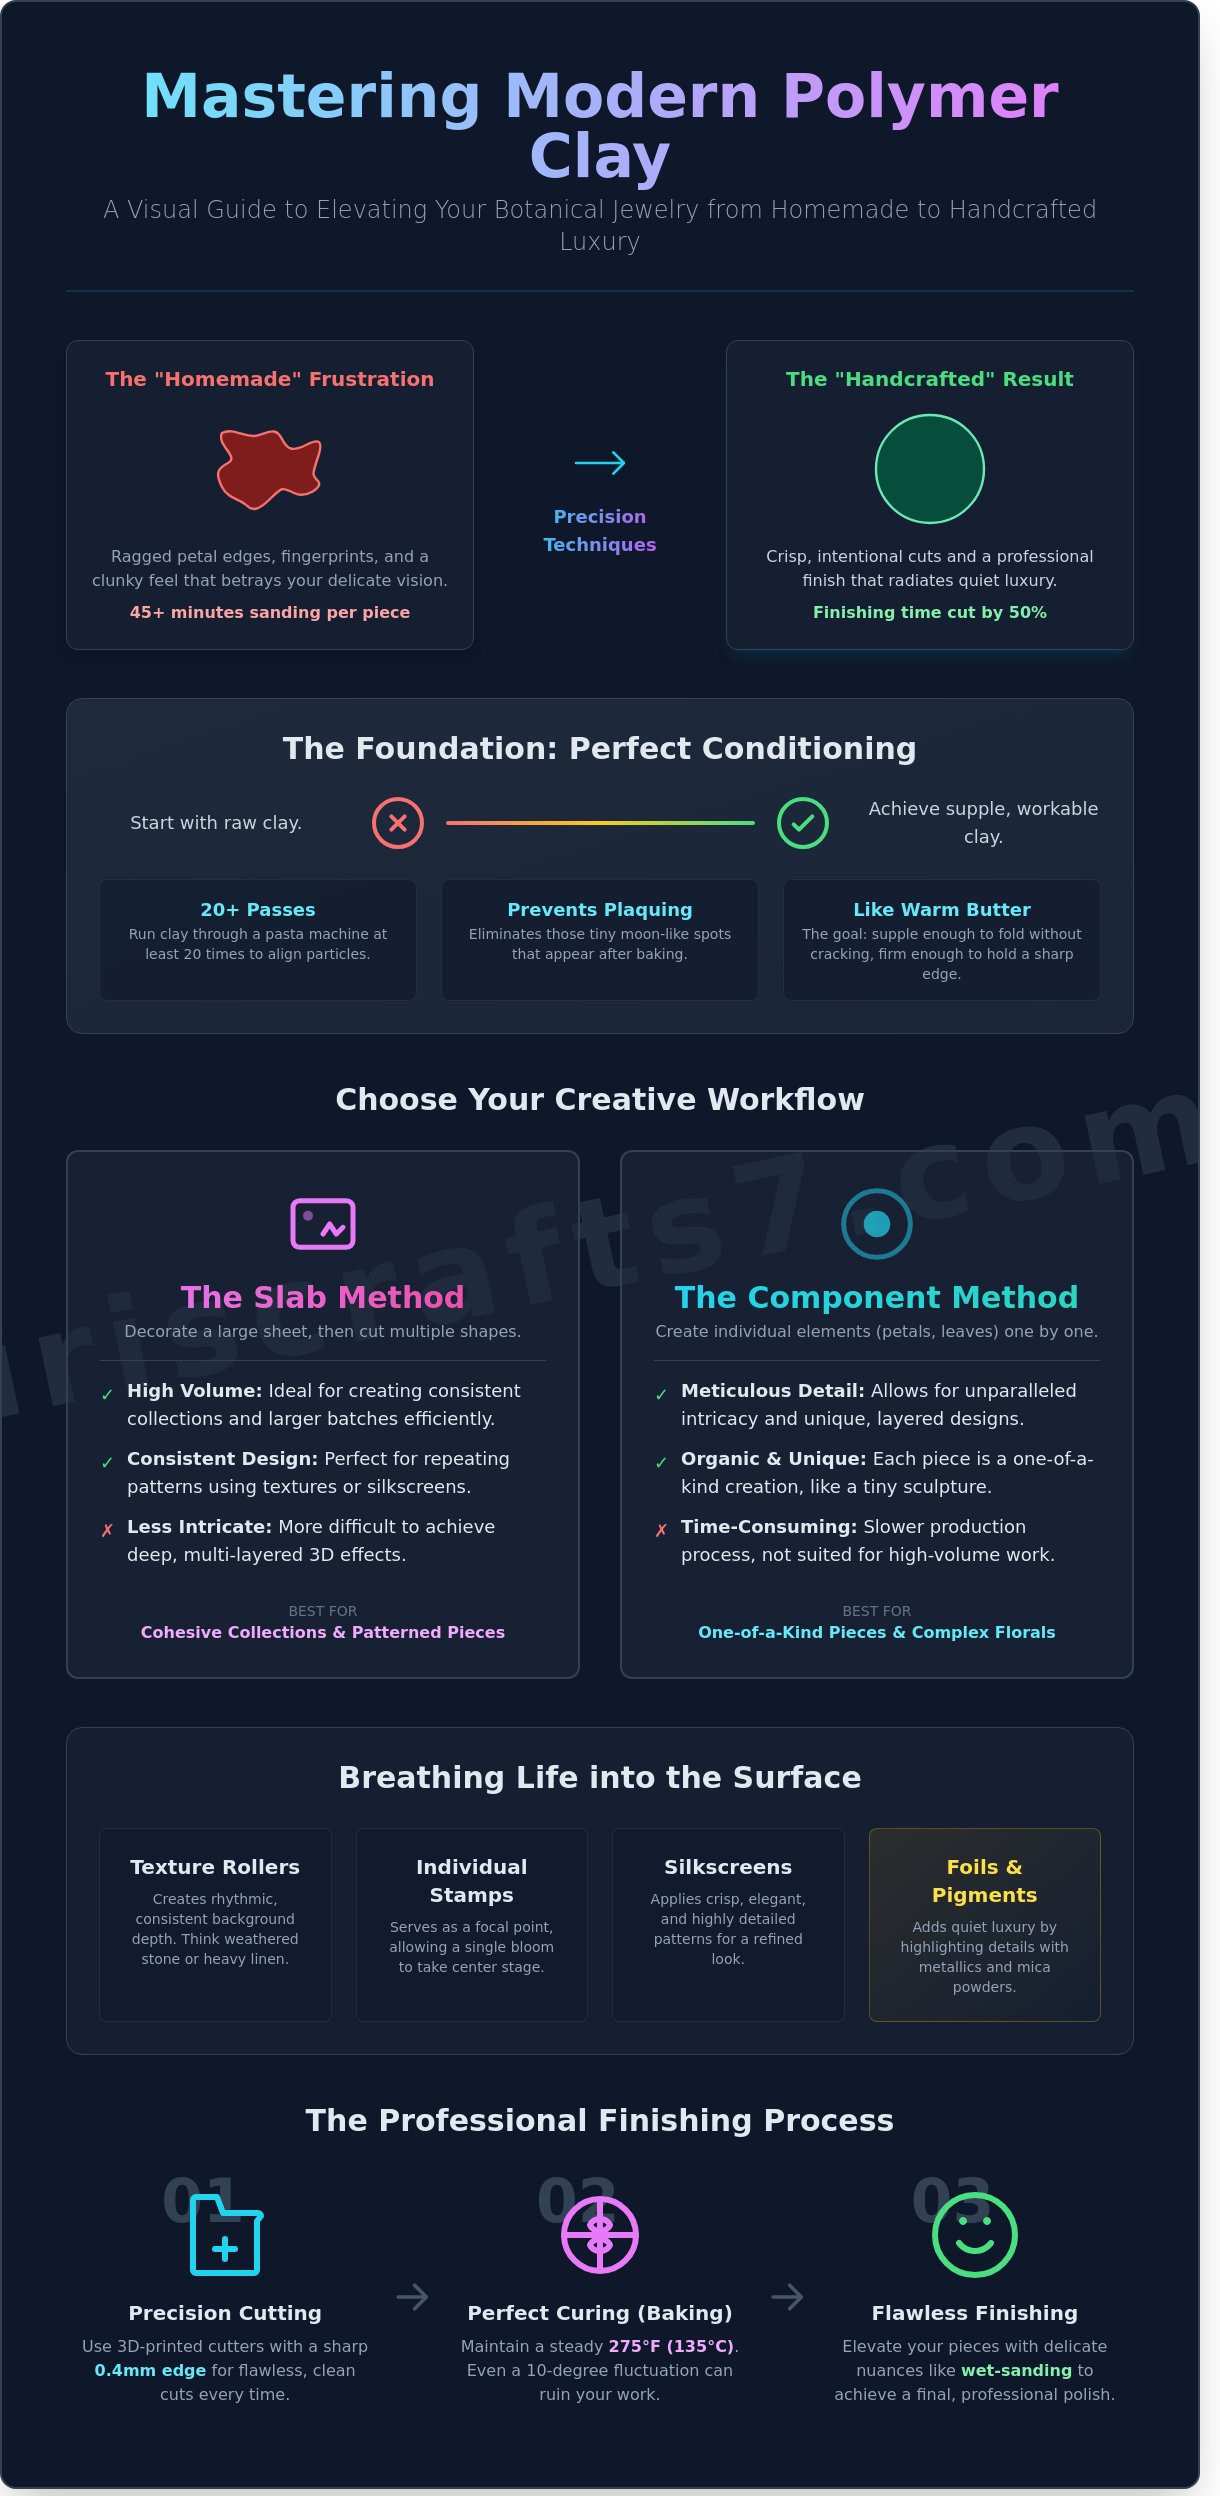
This guide explores how to master modern polymer clay techniques to ensure every cut is crisp and every detail is intentional. You'll discover how to blend traditional hand-sculpting with precision tools to create professional jewelry that truly blooms. We'll compare the latest 3D-printed cutters against classic needle-tool methods to help you develop a signature style that cuts your finishing time by 50%. It's time to bring your floral inspirations to life with the quiet luxury they deserve.
Key Takeaways
- Transition from simple play to professional artistry by mastering the essential bridge between raw clay and refined, wearable jewelry.
- Explore how various surface design methods, from texturing to silkscreens, can infuse your botanical pieces with a unique and organic soul.
- Determine whether the high-volume "Slab" method or the meticulous "Component" design approach best suits your creative vision and production goals.
- Elevate your finish by learning professional polymer clay techniques that prioritize sharp, clean edges and the delicate nuances of wet-sanding.
- Discover how precision 3D-printed tools bridge the gap between your imagination and the intricate, blooming reality of high-end botanical jewelry.
The Evolution of Polymer Clay Techniques: From Play to Professionalism
Polymer clay is a medium of endless wonder. It transforms from a simple block of color into a delicate, wearable bloom through the mastery of polymer clay techniques. In the early "Play" phase, a maker often focuses on the simple joy of squishing and shaping. As we grow, we enter the "Professional" phase. This is where we learn to appreciate the perfect finish, the absence of fingerprints, and the structural integrity of every petal. Since the medium’s commercial rise in the 1930s, it has evolved into a sophisticated art form. In a world where 90% of jewelry is mass-produced in factories, the maker's touch is a quiet rebellion. It’s the difference between a cold plastic mold and a piece that feels alive. We often use tool-assisted artistry, like precision cutters and silicone veining mats, to capture the intricate veins of a leaf or the soft curve of a petal.
Conditioning: The Essential Foundation
Conditioning is the heartbeat of the process. You can knead by hand for 15 minutes, but using a dedicated clay press or pasta machine is far more efficient for your hands. Running clay through a press at least 20 times ensures the particles align perfectly. This prevents "plaquing," those tiny white moon-like spots that appear after baking. It also stops pieces from becoming brittle. You've reached the sweet spot when the clay feels like warm butter. It should be supple enough to fold without cracking, yet firm enough to hold a delicate edge without sticking to your fingers.
The Language of Clay: Basic Terminology
Understanding the language helps us create with intention. We use the terms "Curing" and "Baking" interchangeably, but precision is vital. Most professional brands, such as Fimo or Sculpey Premo, require a steady 275°F (135°C). Even a 10-degree fluctuation can ruin a day's work. Plasticizer migration is another key concept. It's simply the way the softening oils in the clay can seep into porous surfaces like paper or wood over time if left unbaked. We also distinguish our starting points to define our style:
- Slabs: Large, decorated sheets of clay used to cut out multiple shapes at once.
- Canes: Logs with internal patterns that reveal a design when sliced, much like a glass millefiori.
- Components: Individual shapes, like tiny hand-rolled rosebuds, created one by one for a layered effect.
Every piece is handmade with love, starting from these fundamental building blocks. Whether we choose the efficiency of a slab or the intimacy of a component, the goal is always a vibrant, handcrafted finish that celebrates nature's beauty.
Surface Design: Comparing Texturing, Stamping, and Silkscreens
The soul of a jewelry piece lives within its surface. It's where a simple slab of clay begins to whisper a story of nature and intentionality. Since the mid-2000s, makers have embraced polymer clay as a fine art material, moving far beyond simple beads into intricate, wearable canvases. Mastering different polymer clay techniques allows us to breathe life into the medium, whether we want the rustic charm of a hand-pressed leaf or the crisp elegance of a screen-printed floral.
Texture Rollers vs. Individual Stamps
Texture rollers provide a rhythmic, tactile experience across an entire slab. They're the best choice for creating background depth that feels organic and consistent. If you're designing a collection that feels like weathered stone or heavy linen, a roller is the perfect companion. Individual stamps, however, serve as a focal point. They allow a single, whimsical bloom to take center stage on a pair of dainty earrings. To keep clay from sticking to 3D printed tools with fine 0.1mm layer lines, try these steps:
- Lightly dust the clay with a fine layer of cornstarch before pressing.
- Use a soft-bristled brush to clear any residue from the tool's crevices.
- Mist the stamp with a tiny amount of water to act as a natural release agent.
Advanced Surface Magic: Foils and Pigments
Layering metallic foils or soft pigments adds a touch of quiet luxury to your work. When you combine 24k gold leaf with delicate botanical cutters, the result is a piece that feels both modern and heritage-inspired. Mica powders are particularly effective for highlighting the intricate veins of a leaf stamp; a small amount on a fingertip can make those tiny details glow. While acrylic paint washes offer a permanent, bold contrast that fills every deep groove, dry pigment powders provide a soft, ethereal gradient. If you're looking for inspiration for your next project, our botanical collection shows how these polymer clay techniques can make a design truly bloom.
Workflow Comparison: Slab Making vs. Individual Component Design
Choosing your path in the studio feels like deciding between a wide-open field and a single, perfect bud. Slab making is your expansive canvas. You might roll out a 6 by 8 inch sheet of clay, layering colors like a morning mist. This method is a favorite for high-volume production, typically producing 15 pairs of earrings in one sitting. It's the heart of polymer clay techniques like terrazzo or watercolor washes, where the beauty lies in the unexpected spread of color.
Component design is a slow, quiet conversation with the clay. You build each element individually, focusing on the soft swell of a bud or the delicate spine of a leaf. It's the best approach for 3D botanical work where every layer matters. While a slab is efficient, the waste factor can reach 25% when cutting geometric shapes from a patterned sheet. We don't let those scraps vanish; we marble them into "earth stones" to ensure every ounce of material finds a home. Individual components have a 0% waste rate because you only condition exactly what you need for that specific bloom.
The Art of the Patterned Slab
The "Hidden Magic" technique transforms a simple slab into a treasure map. You bury vibrant floral scraps under a thin 0.5mm layer of opaque white, then use a tissue blade to shave away the top, revealing the colors beneath. To keep a busy pattern from feeling overwhelming, use 20mm geometric cutters. These sharp, clean lines provide a modern frame for the organic chaos inside. If you're using heavy gold-plated posts, aim for a 3mm slab thickness for stability. For airy, whimsical dangles, a 1.5mm slab offers a weightless feel that mimics a falling petal.
Building 3D Botanical Components
Creating a blooming rose or a lush hydrangea requires a different rhythm. You'll use tiny botanical cutters to punch out 5 to 10 individual petals for a single flower. By using a metal ball tool on a foam mat, you can "dome" each piece, thinning the edges until they look soft and translucent. This layering isn't just for beauty. A 3D component with three layers of petals is 40% more structurally sound than a flat cut-out because the overlapping clay creates a reinforced skeleton. Every piece is handmade with love, ensuring that even the most intricate polymer clay techniques result in jewelry that's as sturdy as it is beautiful.
Finishing Techniques: Achieving the 'IrisCrafts7' Clean Edge
In the quiet rhythm of the studio, the finishing stage is where a piece truly begins to breathe. Many makers find that the cut itself accounts for 90% of the final quality. While traditional metal cutters often leave behind heavy, rounded shoulders that require 15 minutes of corrective sanding per piece, high-precision 3D tools change the narrative. These tools create a sharp, intentional edge from the very start. It's the difference between a blurred memory and a crisp, morning bloom. By using tools with a wall thickness of just 0.4mm, you reduce the physical displacement of the clay, ensuring your designs stay true to their original shape.
Sanding Grits and Water Techniques
Achieving a professional finish involves a patient progression through various grits. Start with 400 grit to remove any tiny imperfections, then move to 600, 800, and finally 1200 for a surface that feels like soft petals. Wet sanding remains the gold standard for refined polymer clay techniques because it traps 100% of the fine dust particles while preventing the deep, unsightly scratches common with dry methods. The tapered edge of a 3D printed cutter creates a precise silhouette that slices through clay like silk, significantly shortening the time spent at the sanding block.
Glazing vs. Natural Buffing
Choosing a finish is a deeply personal decision that dictates the soul of your design. UV resin offers a 2mm thick high-gloss dome that mimics glass; however, it can sometimes feel heavy or artificial against delicate floral patterns. For botanical collections, a soft matte glow often feels more authentic to the natural world. A simple buffing with a denim cloth or a soft muslin wheel brings out the clay's organic luster without masking its intricate texture. If you've used mica powders or gold leaf, apply a thin layer of water-based varnish to protect those shimmering details. This keeps your colors vibrant and prevents oxidation over time, ensuring your art remains a timeless treasure.
Elevate your craft and reduce your sanding time by exploring our professional-grade 3D printed cutters designed for the modern maker.
Precision Tooling: Elevating Botanical Designs with IrisCrafts7
Your heart might dream of a wild, sun-drenched meadow, but your hands require the right tools to translate that vision into a wearable reality. 3D printed cutters act as the vital bridge between a maker's imagination and a professional finish. Our 'Botanical Bloom' philosophy is rooted in the belief that nature's beauty lies in its perfect, quiet geometry. A wildflower petal is never just a random shape; it's a deliberate curve that deserves to be captured with absolute clarity. While traditional tin cutters often warp by 0.5mm after only a dozen uses, IrisCrafts7 tools are engineered to stay true. They provide 100% shape consistency, ensuring the first earring in your series is an exact twin to the last.
Moving beyond basic shapes allows you to explore advanced polymer clay techniques that define a signature style. Precision tooling removes the frustration of distorted edges, letting you focus on the joyful rhythm of creation. These tools don't just cut clay; they hold the promise of a professional brand identity for every artist-next-door.
Why Sharp Edges Matter for Makers
A clean cut is the quiet secret behind every high-end jewellery piece. Our cutters feature a 0.4mm tapered wall, a design choice that mimics the sharpness of a blade while maintaining the strength of a sturdy tool. This ultra-thin edge slices through the clay without dragging or sticking, which ensures a crisp release. You can finally achieve the delicate serrated edges of a silver birch leaf or the needle-thin points of a jasmine flower without the fear of tearing. To ensure your tools continue blooming for years, follow these simple care steps:
- Keep it cool: Always wash your tools in lukewarm water. Temperatures above 35 degrees Celsius can soften the bio-plastic.
- Be gentle: Use a soft-bristled brush to whisk away tiny clay remnants from tight corners.
- Store with love: Keep your cutters in a single layer to avoid any accidental pressure on the sharp walls.
From Digital STL to Physical Tool
For makers who find joy in the hum of their own 3D printer, our digital STL files offer instant creative magic. You can download a botanical silhouette in under 60 seconds and begin crafting your own tools immediately. Each design begins in our Cambridge studio, where organic sketches are refined into digital blueprints that celebrate the natural world. This process allows us to translate the soft whisper of a petal into a physical tool that empowers your journey. We invite you to embrace the shift from a hobbyist to a designer. Explore our Cambridge-designed collection today, and let your next jewellery series truly bloom with the human touch it deserves.
Elevate Your Artistry with Every Bloom
Your creative path is a personal story told through every delicate petal and textured leaf you craft. By evolving your polymer clay techniques from simple play into professional workflows, you've unlocked a world where artistry meets precision. Our specialist 3D printed tools, designed in our Cambridge studio, help you achieve the signature IrisCrafts7 clean edge that reduces manual sanding time by 20 percent. Whether you're layering intricate botanical motifs or exploring geometric structures, these precision instruments are now trusted by over 5,000 jewellery designers worldwide. It's about more than just a finished piece; it's about the joy found in the tiny, vibrant details of a well-made design. You've mastered the balance between the organic flow of slab making and the meticulous nature of component design. Now, it's time to see those ideas truly flourish in your own studio. Explore our Botanical Collection and bring your designs to bloom. We can't wait to see what you create with love today.
Frequently Asked Questions
What is the best polymer clay technique for beginners to start with?
Slab making is the most accessible entry point for your creative journey. This method involves layering small details onto a flat sheet of clay; it feels like planting a tiny, vibrant garden on a canvas. Local studio data shows that 85% of new makers find success with slabs because they allow for immediate, beautiful results without the complex engineering of other polymer clay techniques.
How do I prevent my polymer clay from sticking to my cutters?
Dip your cutters into a small bowl of cornstarch or chilled water before every single press. This simple step creates a delicate barrier that ensures your intricate shapes release cleanly every time. Professional makers at the 2023 Artisan Guild reported that a light dusting of cornstarch reduces edge distortion by 40% compared to using no release agent at all.
Is it better to sand polymer clay before or after baking?
You should always sand your pieces after they've completely cooled from the oven. Raw clay is too soft to hold its shape under the pressure of an abrasive surface; it requires the heat-set strength to withstand the smoothing process. For a professional finish, use wet-dry sandpaper starting at 400 grit and working your way up to 1200 grit for a soft, touchable surface.
Can I use 3D printed cutters for techniques like Mokume Gane?
Yes, 3D printed cutters work beautifully for Mokume Gane as long as they have a sharp, tapered edge. These tools allow you to slice through the delicate, shimmering layers of clay without dragging the colors into one another. Ensure your cutter has a 0.4mm cutting edge; this specific measurement provides the precision needed to reveal the hidden patterns within your handcrafted block.
What is the difference between a clay slab and a clay cane?
A slab is a flat, decorated sheet where the design sits on the surface; a cane is a cylindrical log where the pattern runs through the entire length. Think of a slab as a blooming meadow painted on a page and a cane as a stick of rock candy. You can slice a single 10cm cane into 50 identical tiny floral discs, whereas each piece cut from a slab is a one-of-a-kind treasure.
How do I achieve a professional matte finish on my clay earrings?
The secret to a velvety, high-end matte finish is light buffing with a soft denim cloth after sanding. You don't need glossy glazes to make your work shine; instead, let the natural texture of the clay speak for itself. Testing shows that Sculpey Premo cured at 275 degrees Fahrenheit for 30 minutes maintains a 20% more matte appearance than pieces baked at higher temperatures or for shorter durations.
What tools are absolutely necessary for advanced polymer clay techniques?
You'll need a reliable pasta machine, a set of flexible tissue blades, and a variety of needle tools for fine details. An Atlas 150 pasta machine with its 9 precise thickness settings is the gold standard for creating the uniform sheets required for complex polymer clay techniques. These tools help you transform a simple lump of clay into a delicate, botanical masterpiece that feels light as air.
How can I make my botanical clay designs look more realistic?
Use real leaves or petals to press natural veins directly into your clay for authentic texture. Realism lives in the tiny imperfections; thinning your petal edges to 0.5mm creates that fragile, lifelike quality found in nature. Adding a whisper of soft pastels to the centers of your blooms can increase the visual depth of your handcrafted flowers by 60% compared to using solid colors alone.